Pokazywanie postów oznaczonych etykietą kurs/course. Pokaż wszystkie posty

poniedziałek, 9 listopada 2015

Mini card tutorial

Hello,Witam

Today I have for you short tutorial for easy christmas card. We will play with  Inka Gold paste - in silver colour, it is very useful pigment paste, great for colouring chipboards. I will show you that you do need many fancy products to make great card. You need just Inka, chipboard and some papers.

Dzisiaj mam dla Was krótki tutorial na świąteczną kartkę. Bawiłam się Inką Gold - srebrnym kolorem. Jest to bardzo napigmentowana pasta, idealna do kolorowania tekturek.  Chcę Wam pokazać, że nie potrzebujemy tak na prawdę dużo produktów by wykonać świetną kartkę. Wystarczy Inka, tekturki i jakieś papiery

For my card I used /  do mojej kartki użyłam:


Prepare panel of paper and through some of you favourite pencil apply Inka gold. After this step immediately clean your stencil, Inka gold dries very fast.(My panel is 13x13cm)
Przygotowałam kawałek papieru oraz ulubioną maskę do naniesienia Inki. Pózniej bardzo szybko trzeba ją umyć, ponieważ Inka błyskawicznie zasycha. Mója kartka ma 13*13 cm


Here is detail of background. I made tiny silver stars.
Tutaj detale tła. Zrobiłam dużo srebrnych gwiazdek.


With the same paste colour reindeer, use your fingers, it is very easy and fast, Inka gold has got great pigment and you will see result immediately. Inka dries quickly you do not need to dry chipboard with heat gun.
Tym samym kolorem, palcami pomalowałam renifera. Inka ma dużo pigmentu jak widzicie. Bardzo szybko schnie więc nie potrzeba suszyć tekturek nagrzewnicą. 


Prepare some of your favourite dies and made  - leaves, snowflakes and some decoration. Really use what you have at home. Firstly glue reindeer and than decoration and silver bow.
Przygotowałam moje ulubione wycinanki - gałązki, śnieżynki i niektóre dekoracje. Naprawdę, może być cokolwiek macie w domu. Pierwsze przykleiłam renifera, pózniej dekoracje i srebrny łuk.


Last step is finish card with decorations and glue panel to no card. If you like mixed media techniques you can make some some splatters with silver acrylic ink. 
Ostatnim krokiem jest wykończenie kartki i naklejenie panelu na bazę. Jeśli lubicie media, możecie także zrobić kleksy srebrną akrylową farbą. 


And that is all from me. I hope you like my short tutorial and you will try to play with chipboards and Inka gold. 
I to już wszystko odemnie. Mam nadzieję, że podobał Wam się mój mini tutorial i spróbujecie pobawić się tekturkami i Inką. 

I think that blue and silver tones of this card make it really elegant and christmas.
Myślę, że niebieska i srebrna tonacja na tej kartce wygląda bardzo elegancko na święta. 

I wish you nice day, Miłego dnia
Katka


poniedziałek, 3 sierpnia 2015

Wedding card - short tutorial

Hi, Cześć

It is summer and we still have wedding season. I prepared for you easy tutorial for wedding card.
Jest lato i jestem ciągle w klimacie ślubnym. Stworzyłam dla Was prosty tutorial na kartkę ślubną
I used/Użyłam


Firs step is to prepare good quality paper (my is from UHK gallery) and sew frame around paper. My card will be square - 13,5x13,5cm.
Pierwszy krok to stworzenie szybko papieru ( u mnie pochodzi z UHK Gallery) i obszycie papieru dookoła. Moja kartka ma wymiary 13,5*13,5 cm


With your favourite stencil and structure paste prepare background, it is not necessary to fill whole space. 
Wez swoją ulubioną maskę i pastę strukturalną  i swtórz tło, nie jest koniecznością by wypełnić całe tło 


Use some of your favourite glitters and pour them over still wet paste. It will make nice sparkling background. You can speed up drying process with heat gun. 
Użyj Twojego ulubionego  brokatu  i zasyp go na jeszcze mokrą pastę. To sprawi, że będzie piękne błyszczące tło. Można przyspieszyć ten  proces suszyć nagrzewnicą.


Here is detail of my background. Tutaj widać detale mojego tła.


Distress edges of card base. Poszarpałam krawędzie kartki.


Glue main chipboard and paper doily. Przykleiłam tekturkę  i papierową koronkę.


Take filigree chipboard and heat emboss it with white embossing ink. My tip: you can make great texture with matte gel, use it instead of embossing ink, apply it over chipboard with brush.
Weź filigranową tekturkę i  tusz do emmbosingu na gorąco. Moja rada: można zrobić dużą teksturę z żelu matowego, używać go zamiast tuszu do emmbosingu, stosuje  go na malowane tekturki.


Glue chipboards. Przyklejam tekturki.


Glue flowers and some leaves, self adhesive pearls. Finish card according your fantasy.
Przyklejam kwiatki oraz liście, różne perełki. Kończę kartkę wg swojego pomysłu.


For finished touch you can use Wink of stella clear brush - it is great pen with light glitters. I painted whole chipboard and some part of flowers. Glue prepared card to the card base. 
Do gotowego projektu można użyć Wink Stella jasny pędzle - to jest świetny długopis z lekkim nabłyszczeniem. Malowałam całe tekturki i jakąś część kwiatów.


And here is final card. Easy wedding card with great chipboards.Tutaj widać wykończoną kartkę. Prosta ślubna kartka z pięknymi tekturkami.


Have a nice day, Miłego dnia
Katka


poniedziałek, 20 lipca 2015

Tutorial - mixed media notepad

Cześć, dzisiaj pokażę kolejną magiczną sztuczkę z użyciem mixed mediów. Razem zamienimy brzydki i tani zeszyt w ekskluzywny mixed-mediowy notes.

Hello, today I will show you another magic of mixed media. We turn together ugly cheap notepad into exclusive mixed media notepad. 

Użyłam tych tekturek / I used these chipboards:


Tak to wyglądało na początku: różowy notes z grubą okładką (która jest potrzebna jeśli chcesz używać dużej ilości mediów). 

That was at the beginning - pink notepad with heavy folder - that is necessary to have when you want to use mixed media techniques. 


Malujemy całą okładkę białym gessem. Nie może zostać żadna różowa przestrzeń. Wysychanie można przyśpieszyć nagrzewnicą. 

Paint whole folder with white Gesso, we need to have white space, no pink colour. Speed up drying with heat gun, use heat gun for all drying, it is fast. 


Używamy naszych ulubionych szablonów i pasty strukturalnej dla osiągnięcia interesującego tła. Czekamy aż wyschnie/suszymy.

Use your favourite stencil and structure paste to make interesting background.  Dry it. 


Sizal pozwala na osiągniecie super tekstury, można go przykleić medium żelowym. Oczywiście możecie z tego zrezygnować.

Great texture make sisal, glue some with gel medium. (but this step is not necessary).


Za pomocą medium żelowego przyklejamy wszystkie tekturki. Takie medium jest genialne, trzyma wszystko i jest przezroczyste po wyschnięciu.

With gel medium glue all chipboards. Gel medium is great, it has got power to hold everything and when it is dry it is transparent.


Przyklejamy pozostałe ozdoby - ja użyłam materiałowych kwiatów i żywicznych elementów. Kolejnym opcjonalnym krokiem jest użycie medium żelowego i innych mediów - piasku, koralików, płatków miki (użyłam cudnych produktów z 13arts, przepraszam za reklamę, ale to polska marka :D). Używamy wszystkiego, co lubimy i co mamy w domu. Ważne, żeby stworzyć interesujące tło.

Glue other embellishments - I used textile flowers and some resin embellishments. Another voluntary step is to use gel medium and different medias - sand, beads, mica flakes (I used great products from 13arts, sorry for advertisement, but I love them and it is your Polish brand). Use what you like and what you have at home. Our goal is to make some interesting background. 


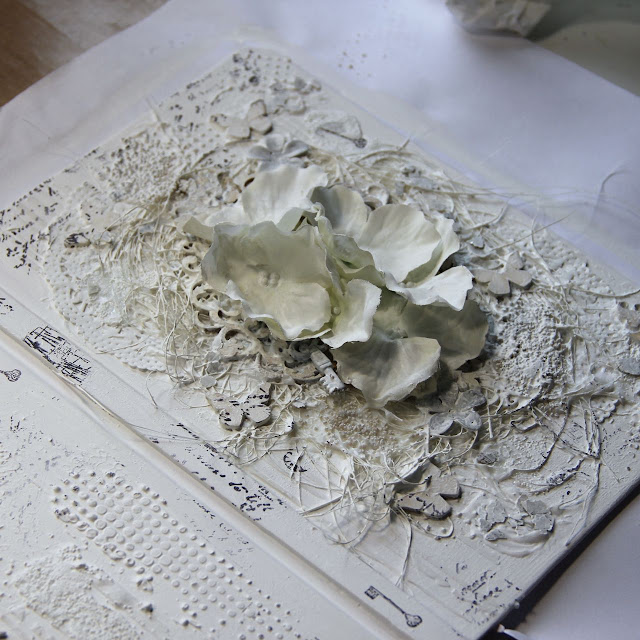
Kiedy już wszystko jest przyklejone, suszymy okładkę nagrzewnicą. Potem malujemy znowu wszystko gessem.Wszystko powinno być białe. Suszymy.

When everything is glued, dry whole folder with heat gun. And than paint everything with Gesso, Everything should be white. Dry it. 


Jeśli chcemy, możemy postemplować okładkę ulubionymi stemplami. Ja użyłam tekstowego stempla i Primowych stempli.

If you want with Archival ink stamp some of you favourite stamps. I used script and some Prima marketing images.


Na końcu kolorujemy wszystko mgiełkami. Ja użyłam Lindy's stam gang. Do tego woda i Splash! białego i czarnego z 13arts. A teraz zdjęcia gotowego notesu.

Final step is to paint whole folder with sprays. I used Lindys stamp gang sprays. And water and splash white and black from 13arts. I made for you many detailed photos of  finished folder. 


I to już koniec. Jeśli chcecie mieć bardzo sztywne i trwałe okładki, pomalujcie dodatkowo wszystko medium żelowym. Jest matowe i transparentne. 

And that is all. if you want have very firm folders paint everything with gel medium. It is matte and transparent. 

Miłego dnia, Have a nice day
Katka Dachovska